How to Set Up Box Art on Emulationstation Windows 10
Installing EmulationStation
Configuring EmulationStation
 Installing on Windows
Download and run the installer.
Configure EmulationStation.
I wish every section was this curt.
Annotation: if you choose to apply the ZIP file instead, yous must also install the MSVC2013 x86 redistributable.
 Installing on Debian
You can either install a stable version of EmulationStation from a pre-made packet, or compile the bleeding edge developer version.
Install the latest stable bundle.
Download and install the Debian package, either 32-chip or 64-bit.
Configure EmulationStation.
Or, compile the latest version yourself.
Make certain everything is up to date
sudo apt-get update sudo apt-get upgrade Install dependencies
sudo apt-go install -y libsdl2-dev libboost-organisation-dev libboost-filesystem-dev libboost-engagement-time-dev libboost-locale-dev libfreeimage-dev libfreetype6-dev libeigen3-dev libcurl4-openssl-dev libasound2-dev libgl1-mesa-dev build-essential cmake git Download the latest source
git clone https://github.com/Aloshi/EmulationStation Compile and install information technology
cd EmulationStation git checkout unstable cmake . make sudo brand install  Installing on Raspberry Pi (RetroPie)
The RetroPie Project provides an easy way to install over 30 unlike emulators on the Raspberry Pi, using EmulationStation every bit a front-terminate. This is one of the easiest ways to go your Raspberry Pi ready for some retro gaming goodness.
NOTE: RetroPie is non a part of EmulationStation. If you have problems with it, report them on the RetroPie GitHub issues page. EmulationStation is only the front-terminate. Furthermore, the version of EmulationStation provided by RetroPie is a fork adding some RetroPie-specific customizations and features.
Installing on Raspberry Pi (Stand-alone)
This is a guide for everything you lot need to install EmulationStation on a fresh Raspbian Stretch install. All the dependencies are in the Raspbian apt repositories.
Make sure everything is upwardly to date
sudo apt-get update sudo apt-get upgrade sudo rpi-update Set the minimum amount of RAM to the GPU
sudo nano /kicking/config.txt # add together or supercede "gpu_mem = 32" # if you skip this step, you will probably get "out of memory" errors when compiling Reboot to apply GPU RAM changes and brand sure yous're using the newest firmware
sudo reboot Install dependencies for EmulationStation
sudo apt-get install -y libboost-organization-dev libboost-filesystem-dev libboost-date-time-dev libboost-locale-dev libfreeimage-dev libfreetype6-dev libeigen3-dev libcurl4-openssl-dev libasound2-dev cmake libsdl2-dev Compile and install EmulationStation
git clone https://github.com/Aloshi/EmulationStation cd EmulationStation mkdir build cd build # On the RPi 2, you may need to add together '-DFREETYPE_INCLUDE_DIRS=/usr/include/freetype2/'. # Run into issue #384 on GitHub for details. cmake .. # you can add together -j2 hither to use 2 threads for compiling in parallel (depending on how many cores/how much memory your RPi has) make -j2 This will have a long time.
If you want to install emulationstation to /usr/local/bin/emulationstation, which volition let you merely type 'emulationstation' to run it, you can do:
sudo make install NOTE: This will conflict with RetroPie, which installs a fustigate script to /usr/bin/emulationstation.
Otherwise, you lot tin run the binary from the root of the EmulationStation binder:
../emulationstation Reset GPU RAM to normal values and reboot
sudo nano /boot/config.txt # alter/add "gpu_mem = 32" to "gpu_mem = 128" or "gpu_mem = 256", depending on your Pi model sudo reboot Configure EmulationStation and install some themes.
Configuring EmulationStation
Alarm: Exercise not edit configuration files while EmulationStation is running. This has been known to cause strange side furnishings, like overwritten files and melting the polar ice caps.
If you lot are using a pre-configured distribution like RetroPie, you lot can probably skip this section.
You might want to read the README.md file too equally this document.
The .emulationstation Binder
EmulationStation stores all of its configuration files relative to some "dwelling house folder." Every EmulationStation configuration file goes in a .emulationstation folder inside of this "home folder."
I occasionally refer to this path as ~/.emulationstation . Simply mentally replace the ~ with your platform'due south abode binder.
Windows
On Windows, the "domicile folder" is set by the %HOMEPATH% environment variable. To come across where that actually is, but type it into the Windows Explorer window and press enter:


And then, the complete path to the .emulationstation folder is %HOMEPATH%\.emulationstation .
Linux
On Linx, this is equivalent to the $Abode environment variable. This is where your final and file browser should first.
So, the complete path to the .emulationstation binder is $Domicile/.emulationstation .
NOTE: On Linux, files and folders that start with a . are "subconscious folders," so the .emulationstation folder may non appear. If you are using the terminal, you lot can use ls -a to list all files in a directory, including subconscious ones. If y'all are using a graphical interface, there should be an option to show hidden files and folders.
The es_systems.cfg File
This is the chief configuration file for EmulationStation. It is located at ~/.emulationstation/es_systems.cfg . It is an XML document that defines a list of systems . A system contains the minimum information required to observe your games and start them.
Here is an example, with comments:
<!-- This is the EmulationStation Systems configuration file. All systems must be independent within the <systemList> tag.--> <systemList> <!-- Here's an example system to become you started. --> <system> <!-- A brusque identifier for the system. Used in some binder structures and error messages. --> <name>snes</name> <!-- A "pretty" name, displayed in the menus and such. This tag is optional. --> <fullname>Super Nintendo Entertainment System</fullname> <!-- The path to the acme-most binder to beginning searching for games in. If the first grapheme is '~', information technology will exist expanded to the home folder. All subdirectories will be included. You can use forward slashes for any platform and backslashes on Windows. --> <path>~/roms/snes</path> <!-- A list of extensions to search for, delimited by commas or spaces. Yous MUST include the period at the start of the extension! It's likewise instance sensitive. --> <extension>.smc .sfc .SMC .SFC</extension> <!-- This is the crush command that is executed to run a game. A few special tags are replaced if found in a command, like %ROM%. This example would run the shell control "snesemulator /domicile/user/roms/snes/Super\ Mario\ World.sfc". <control>snesemulator %ROM%</command> <!-- The platform(south) to use when scraping (download box fine art and such). Y'all can see the full list of accepted platforms below. Everything should be lowercase. This is only *only* used to give more authentic search results, so this tag is optional. You can apply multiple platforms, delimited by commas or spaces. For example: "genesis, megadrive". --> <platform>snes</platform> <!-- This is the theme to load from the current theme gear up. This tag is also optional; if not set, it will default to the value of <name>. It is recommended that y'all apply a proper noun from the "Recommended Theme Names" listing below to make installing themes as painless as possible.--> <theme>snes</theme> </organization> </systemList> Notice all <organisation> south are listed inside of 1 <systemList> tag.
If you want to add another organisation, just add together it like so:
<systemList> <arrangement> <!-- System one --> </system> <system> <!-- System 2 --> </organisation> <!-- And so on... --> </systemList> Systems are displayed in the order they are defined.
Notation: If a system does non accept at to the lowest degree one game present (that matches the extension list), it volition not exist displayed.
If no systems accept games present, y'all will get an "invalid configuration" fault!
Recommended Theme Names
EmulationStation volition not restrict the names you pick for themes. However, in the interest of keeping installing themes a simple drag-and-drop process for everyone'southward setup, delight employ one of the post-obit as your organization's theme name:
NOTE: These are example sensitive on Linux.
3do amiga amstradcpc apple2 fine art atari2600 atari5200 atari7800 atari800 atarijaguar atarijaguarcd atarist atarifalcon atarixe c64 colecovision amstradcpc fba gamegear gb gba gbc gc intellivision macintosh mame mastersystem megadrive n64 neogeo nes ngp ngpc pc pcengine ports psx scummvm sega32x segacd snes zmachine zxspectrum (if it's non here, yous are free to make something upwards, since a theme probably doesn't exist for it yet)
Platform Names
This is the list of valid platforms you can in a <platform> tag. The platform is used when scraping to provide more accurate results. Yous can use more than i platform.
NOTE: These are instance sensitive.
-
3do -
amiga -
amstradcpc -
apple2 -
arcade -
atari800 -
atari2600 -
atari5200 -
atari7800 -
atarilynx -
atarist -
atarijaguar -
atarijaguarcd -
atarixe -
colecovision -
c64- commodore 64 -
intellivision -
macintosh -
xbox -
xbox360 -
msx -
neogeo -
ngp- neo geo pocket -
ngpc- neo geo pocket color -
n3ds- nintendo 3DS -
n64- nintendo 64 -
nds- nintendo DS -
nes- nintendo entertainment organization -
gb- game male child
-
gba- game boy advance -
gbc- game male child color -
gc- gamecube -
wii -
wiiu -
pc -
sega32x -
segacd -
dreamcast -
gamegear -
genesis- sega genesis -
mastersystem- sega master system -
megadrive- sega megadrive -
saturn- sega saturn -
psx -
ps2 -
ps3 -
ps4 -
psvita -
psp- playstation portable -
snes- super nintendo entertainment system -
pcengine- turbografx-sixteen/pcengine -
wonderswan -
wonderswancolor -
zxspectrum -
ignore- practice non allow scraping for this system; volition remove this system from the scraping list and remove the "scrape" button in the metadata editor.
(if y'all suspect this is non up to date, check src/PlatformId.cpp )
Launch Commands
Launch commands depend on what emulator you want to use.
95% of the time, /path/to/emulator %ROM% or C:\path\to\emulator.exe "%ROM_RAW%" works.
If yous're using MAME, /path/to/mame %BASENAME% should do the trick.
The following strings are replaced in your launch command:
-
%ROM%- Replaced with the shell-escaped absolute path to the selected ROM. On Linux, most Bash special characters are escaped with a backslash. On Windows, the ROM path is automatically enclosed in quotes, which is equivalent to "%ROM_RAW%" (equally of version 2.0.one). -
%BASENAME%- Replaced with the "base of operations" proper noun of the path to the selected ROM. For instance, a path of "/foo/bar.rom", this tag would be "bar". This tag is useful for setting upward MAME. -
%ROM_RAW%- Replaced with the unescaped, absolute path to the selected ROM. If your emulator is picky about paths or you are on Windows, you might want to employ this instead of %ROM%, but enclosed in quotes. For example:higan "%ROM_RAW%".
Installing Themes
If you used the Windows installer or Debian package, a set of default themes should already be installed (to ~/.emulationstation/themes on Windows and /etc/emulationstation/themes on Linux).
As long as you used a proper name from the listing in a higher place, yous only need to download and extract the theme set to ~/.emulationstation/themes . If the themes binder doesn't already exist, just create it.
After that, select the new theme gear up in Carte -> UI SETTINGS -> THEME SET , like so:
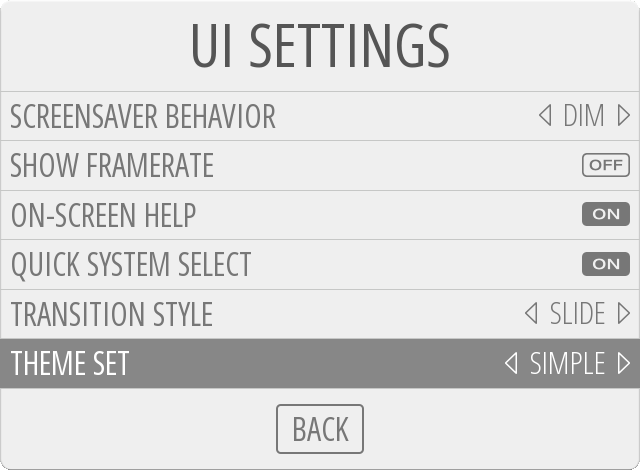
That's information technology!
There'south no defended Themes page on the website yet, but the official theme tin exist downloaded here.
Source: https://emulationstation.org/gettingstarted.html
0 Response to "How to Set Up Box Art on Emulationstation Windows 10"
Post a Comment